Auto lock, also known as screen lock or idle lock, is a security feature on PCs that automatically locks the screen after a period of inactivity. While this feature is essential for protecting your sensitive data and preventing unauthorized access, it can be frustrating in certain situations. Constantly having to re-enter your password can interrupt your workflow and lead to unnecessary time wastage. Fortunately, you can customize this setting and disable auto lock when it’s not required. In this article, we will walk you through the step-by-step process of turning off auto lock on your PC, whether you are using Windows or macOS.
I. Understanding Auto Lock and Its Purpose
Before we delve into the disabling process, it’s essential to understand the purpose of auto lock. This security feature is designed to protect your computer from unauthorized access when you are away from it. After a predefined period of inactivity, your PC will automatically lock, requiring you to enter your password or PIN to regain access. This ensures that even if you step away from your computer briefly, no one else can access your files or personal information.
II. Reasons to Disable Auto Lock
While auto lock is crucial for security, there are several valid reasons to consider disabling it temporarily or permanently:
1. Prolonged Work Sessions:
If you are engaged in a task that doesn’t require constant interaction with your PC, like reading a lengthy document or watching a video, auto lock can be intrusive.

2. Software Development and Testing:
Developers and testers often need uninterrupted access to their computers during long periods of coding, debugging, or testing.
3. Presentations and Demonstrations:
Auto lock can be an inconvenience during presentations or when demonstrating something to an audience.
4. Media Playback:
When playing music or videos on your PC, auto lock can interrupt the media and prompt you to unlock the screen.
III. Disabling Auto Lock on Windows
Windows operating system offers various methods to disable auto lock. Here are the two primary ways:
1. Changing Power & Sleep Settings:
- Click on the Start button and go to “Settings” (the gear icon).
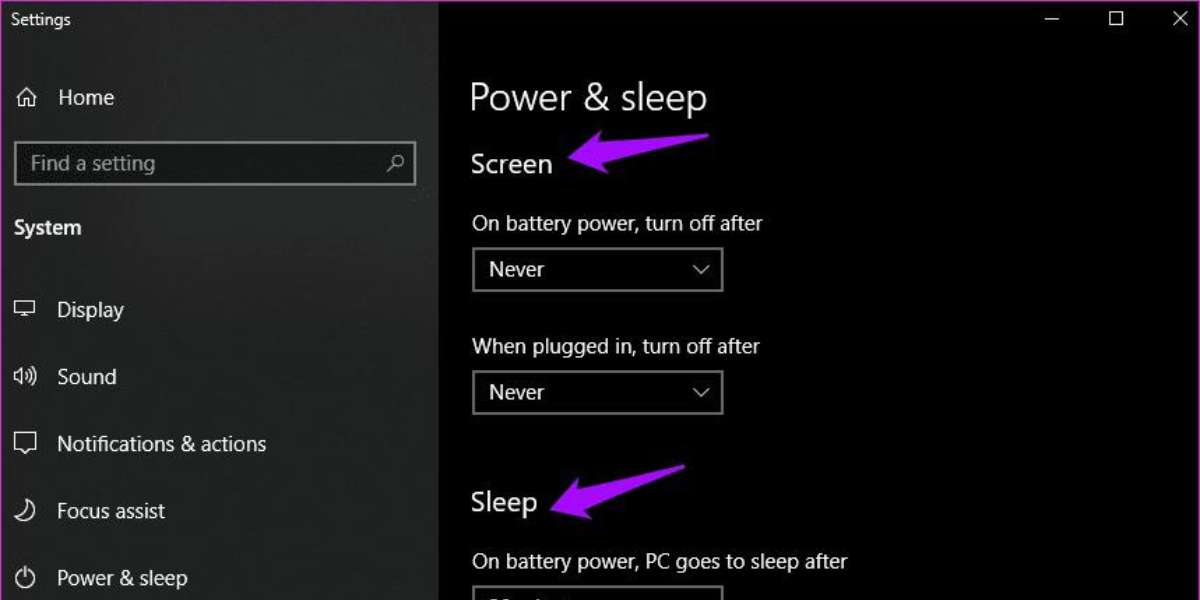
- In the Settings window, select “System” and then click on “Power & sleep” from the left-hand sidebar.
- Under the “Screen” section, adjust the drop-down menu for “On battery power, turn off after” and “When plugged in, turn off after” to “Never.”
- Additionally, you can change the “Sleep” settings to avoid automatic sleep mode during inactivity.
2. Editing Group Policy (For Windows Pro and Enterprise Versions):
- Press “Win + R” to open the Run dialog box, then type “gpedit.msc” and hit Enter.
- In the Local Group Policy Editor, navigate to “Computer Configuration” > “Administrative Templates” > “Control Panel” > “Personalization.”
- On the right-hand side, find and double-click “Enable screen saver” to open its properties.
- Select “Disabled” and click “Apply” and then “OK.”
IV. Turning Off Auto Lock on macOS
If you’re using a Mac, you can disable the auto lock feature through the following steps:
1. Open System Preferences:
- Click on the Apple logo in the top-left corner of the screen.
- From the drop-down menu, select “System Preferences.”
2. Access Security & Privacy Settings:
- In System Preferences, click on “Security & Privacy.”
- Navigate to the “General” tab.
3. Adjust Auto Lock Settings:
- You will find the “Require password” option with a drop-down menu.
- By default, it might be set to “immediately” or a specific time duration (e.g., “5 seconds” or “1 minute”).
- Change this setting to “Off” to disable auto lock or select a longer time duration according to your preference.
V. Third-Party Software Solutions
Apart from the native settings provided by your operating system, some third-party software applications can help you manage auto lock settings more effectively. These tools often offer additional customization options and features that can enhance your PC usage experience.
How to Play Pokémon Black and White 2 on PC?
VI. The Importance of Manual Locking
While it’s useful to disable auto lock temporarily, it’s crucial to remember the importance of manually locking your computer whenever you step away from it. This simple practice ensures your PC remains protected from potential security threats, especially in public or shared environments.
VII. Security Considerations and Best Practices
As mentioned earlier, disabling auto lock should be approached with caution, as it can potentially compromise the security of your PC and sensitive data. Before deciding to turn it off, consider implementing the following security practices:
1. Enable Password Protection:
Ensure that your PC is password-protected, requiring a password or PIN to log in. This will add an extra layer of security, even if you disable auto lock temporarily.
2. Use a Screensaver Password:
Instead of completely disabling auto lock, you can set up a screensaver with a password requirement after a certain period of inactivity. This way, your PC will still lock automatically, but you can avoid frequent interruptions during specific tasks.
3. Create Separate User Accounts:
If you share your computer with others, consider setting up individual user accounts for each user. This will ensure that everyone’s data remains private and protected.
4. Encrypt Sensitive Data:
Consider encrypting sensitive files and folders on your PC to safeguard them from unauthorized access, even if someone gains physical access to your computer.
5. Lock Your PC Manually:
As mentioned earlier, develop the habit of manually locking your PC whenever you step away from it, even if auto lock is disabled. Simply pressing the “Windows key + L” on Windows or “Control + Shift + Power” on Mac will quickly lock the screen.
How to Loop a YouTube Video on PC?
VIII. Temporarily Disabling Auto Lock
If you only need to disable auto lock for a specific task or session, you can use various shortcuts and settings to achieve this without permanently altering your PC’s configuration. Here’s how you can do it:
1. On Windows:
Press the “Windows key + R” to open the Run dialog box, type “control powercfg.cpl” and press Enter. In the Power Options window, choose a power plan that keeps your PC awake (e.g., “High performance” or a custom plan), and then set the “Turn off the display” and “Put the computer to sleep” options to a longer duration or “Never.”
2. On macOS:
Press the “Control + Shift + Power” keys simultaneously to turn off the display without activating the auto lock feature. To revert to the default behavior, press any key or move the mouse.
IX. Re-enabling Auto Lock
Once you have completed your task or session, it’s essential to re-enable auto lock to maintain the security of your PC. Simply follow the steps mentioned in sections III and IV, depending on your operating system, to revert to the default auto lock settings.
X. Conclusion
Disabling auto lock on your PC can be a useful customization to improve productivity and user experience during specific tasks. However, it’s crucial to exercise caution and consider the security implications before making this change. Always ensure your PC is password-protected, and use additional security measures like screensaver passwords, separate user accounts, and data encryption to safeguard your sensitive information.
Remember that auto lock is an essential security feature designed to protect your PC from unauthorized access, and turning it off should only be done when necessary. Be mindful of your computer usage and manually lock your PC whenever you step away from it, even if auto lock is temporarily disabled. By striking the right balance between security and convenience, you can optimize your PC usage while keeping your data safe.
How Much Does a Desktop PC Weigh?
Lastly, the methods and steps provided in this article are based on the operating systems available up to September 2021. As technology evolves, the process of disabling auto lock might change or new features may be introduced. Always refer to the official documentation and support resources provided by your operating system’s manufacturer for the most up-to-date information and instructions.


Leave a Reply