


Taking a screenshot on a Mac computer is a straightforward process. It is a useful tool when you need to capture a portion of your screen or save an image for future reference. In this article, we will guide you through the various methods to take a screenshot on a Mac.
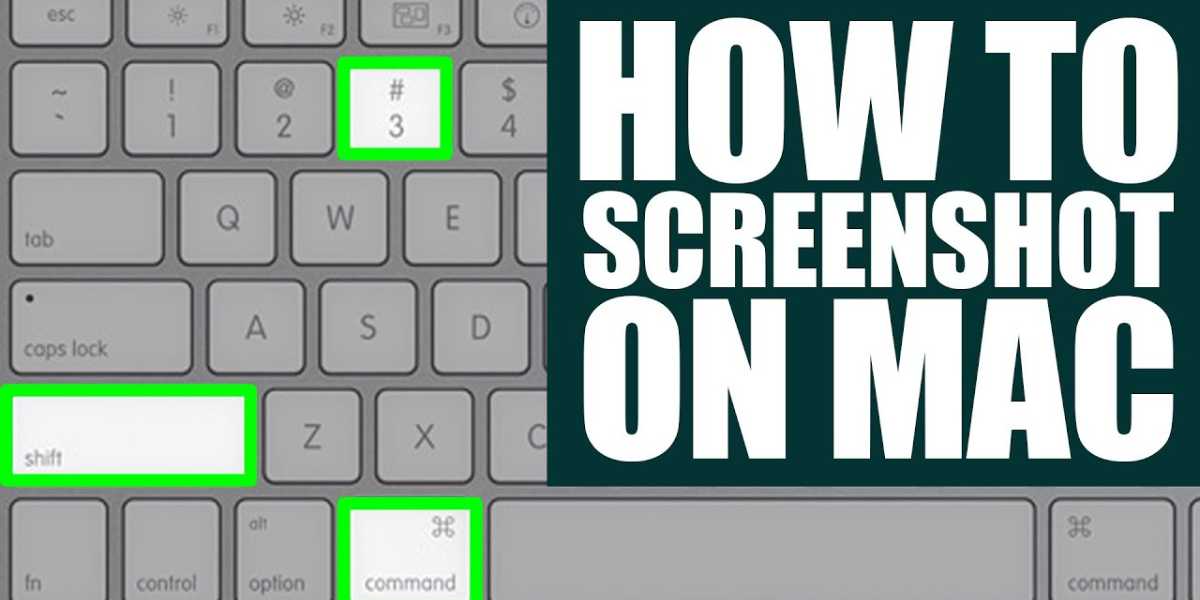
Method 1: Capture the Entire Screen
The first method is to take a screenshot of the entire screen. This method is useful when you need to capture everything that is displayed on your screen, including multiple windows.
Step 1: Press the Command + Shift + 3 keys simultaneously.
Step 2: The screenshot will be saved on your desktop as a PNG file with the current date and time as the filename.
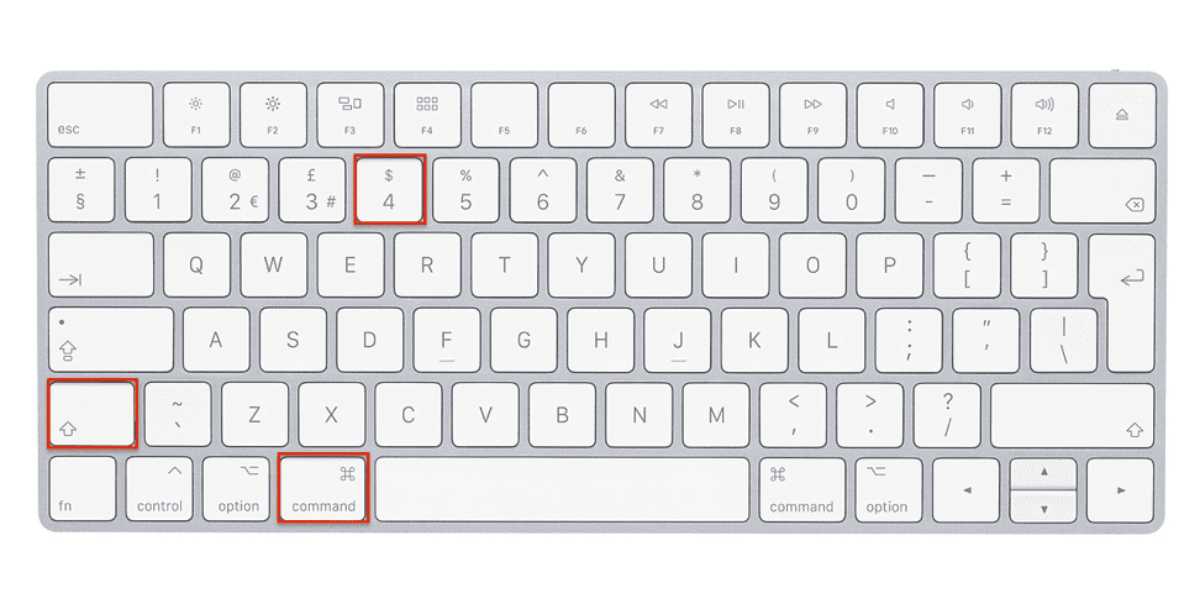
Method 2: Capture a Specific Window
The second method is to take a screenshot of a specific window. This method is useful when you want to capture only one window, such as a browser window or an application.
Step 1: Click on the window you want to capture to make sure it is the active window.
Step 2: Press the Command + Shift + 4 keys simultaneously.
Step 3: Your cursor will turn into a crosshair.
Step 4: Move the crosshair to the top left corner of the window you want to capture.
Step 5: Hold down the left mouse button and drag the crosshair to the bottom right corner of the window.
Step 6: Release the mouse button to take the screenshot.
Step 7: The screenshot will be saved on your desktop as a PNG file with the current date and time as the filename.
Method 3: Capture a Portion of the Screen
The third method is to take a screenshot of a portion of the screen. This method is useful when you want to capture only a specific portion of the screen, such as an image or a text.
Step 1: Press the Command + Shift + 4 keys simultaneously.
Step 2: Your cursor will turn into a crosshair.
Step 3: Move the crosshair to the top left corner of the area you want to capture.
Step 4: Hold down the left mouse button and drag the crosshair to the bottom right corner of the area.
Step 5: Release the mouse button to take the screenshot.
Step 6: The screenshot will be saved on your desktop as a PNG file with the current date and time as the filename.
Method 4: Capture a Touch Bar
The fourth method is to take a screenshot of the Touch Bar. This method is only applicable to Mac computers with a Touch Bar.
Step 1: Press the Command + Shift + 6 keys simultaneously.
Step 2: The screenshot will be saved on your desktop as a PNG file with the current date and time as the filename.
Method 5: Capture a Menu
The fifth method is to take a screenshot of a menu. This method is useful when you want to capture a menu that is displayed on your screen.
Step 1: Click on the menu you want to capture.
Step 2: Press the Command + Shift + 4 keys simultaneously.
Step 3: Your cursor will turn into a crosshair.
Step 4: Move the crosshair to the menu you want to capture.
Step 5: Hold down the left mouse button and drag the crosshair to cover the entire menu.
Step 6: Release the mouse button to take the screenshot.
Step 7: The screenshot will be saved on your desktop as a PNG file with the current date and time as the filename.
Method 6: Capture a Timed Screen
The sixth method is to take a timed screenshot. This method is useful when you need to capture a screenshot after a delay.
Step 1: Press the Command + Shift + 5 keys simultaneously.
Step 2: In the screenshot toolbar that appears at the bottom of the screen, click on the Timer button.
Step 3: Choose the amount of time you want to wait before taking the screenshot.
Step 4: Select the type of screenshot you want to take from the options available, such as capturing the entire screen, a specific window, or a portion of the screen.
Step 5: Click on the Capture button to start the countdown.
Step 6: After the countdown ends, the screenshot will be taken and saved on your desktop as a PNG file with the current date and time as the filename.
Other Tips and Tricks
In addition to the six methods discussed above, there are some additional tips and tricks that you can use to make taking screenshots on your Mac even more convenient.
Change the Default Screenshot Location
By default, all screenshots on a Mac are saved on the desktop. However, you can change the default location to a different folder. To do this, open Terminal and type in the following command:
defaults write com.apple.screencapture location /path/to/folder
Replace “/path/to/folder” with the file path to the folder where you want to save your screenshots.
Edit Screenshots before Saving
If you want to edit your screenshots before saving them, you can use the Markup tool in Preview. To do this, open the screenshot in Preview, click on the Markup button, and use the various editing tools to annotate, crop, or add text to your screenshot.
Use Third-Party Screenshot Apps
There are many third-party screenshot apps available for Mac that offer additional features such as advanced editing tools, automatic uploading to cloud storage, and more. Some popular options include Snagit, Skitch, and CloudApp.
Use the Grab App
The Grab app is a built-in screenshot tool that offers some additional features over the standard screenshot methods. To use Grab, follow these steps:
Step 1: Open the Grab app from the Utilities folder in the Applications folder.
Step 2: Choose the type of screenshot you want to take from the Capture menu, such as a timed screen or a selection screen.
Step 3: If you choose the timed screen, you will have 10 seconds to prepare the screen before the screenshot is taken. If you choose the selection screen, simply drag the crosshair cursor to select the area you want to capture.
Step 4: After the screenshot is taken, it will open in the Grab app where you can edit and save it.

Use the Touch Bar
If you have a MacBook Pro with a Touch Bar, you can take screenshots using the Touch Bar. To do this, follow these steps:
Step 1: Press the Shift + Command + 6 keys simultaneously.
Step 2: The screenshot will be taken and saved as a PNG file on the desktop.
Use the Screenshot App
The Screenshot app is a built-in screenshot tool that was introduced in macOS Mojave. To use the Screenshot app, follow these steps:
Step 1: Press the Command + Shift + 5 keys simultaneously.
Step 2: In the screenshot toolbar that appears at the bottom of the screen, choose the type of screenshot you want to take, such as capturing the entire screen, a specific window, or a portion of the screen.
Step 3: Click on the Options button to choose additional settings such as where to save the screenshot, whether to include the mouse pointer, and more.
Step 4: Click on the Capture button to take the screenshot.
Step 5: After the screenshot is taken, it will appear as a thumbnail in the bottom-right corner of the screen. Click on the thumbnail to edit or save the screenshot.
How to import iphone photos to PC?
How to Take a Screenshot on a Mac with a Timer?
Sometimes you may need to take a screenshot of something that requires a few seconds of preparation, such as opening a menu or dropdown. In such cases, using the timer feature can be useful. To take a screenshot on a Mac with a timer, follow these steps:
Step 1: Press the Command + Shift + 5 keys simultaneously.
Step 2: In the screenshot toolbar that appears at the bottom of the screen, click on the Timer button.
Step 3: Choose the amount of time you want to wait before taking the screenshot.
Step 4: Select the type of screenshot you want to take from the options available, such as capturing the entire screen, a specific window, or a portion of the screen.
Step 5: Click on the Capture button to start the countdown.
Step 6: After the countdown ends, the screenshot will be taken and saved on your desktop as a PNG file with the current date and time as the filename.
In conclusion, taking a screenshot on a Mac is a simple process that can be accomplished using various methods. Whether you want to capture the entire screen, a specific window, or a portion of the screen, there is a method for you. By using the tips and tricks outlined in this article, you can make taking and editing screenshots on your Mac even more convenient and efficient.